
From the Units & Tenants tab, Rentpost users can...
Add units, tenants, and prospects (potential, future tenants).
- To Import Unit/Tenant Information in Mass: see the help topic “Importing your Units & Tenants” – or e-mail our relax team at RELAX@RENTPOST.COM, request info regarding "Mass Imports," and a Relax team member will assist you to input mass amounts of information into your Rentpost account quickly and accurately.
- Adding a Unit Manually: click the "Add Unit" button located in the top right corner of the screen
 , and after you've selected this option you may:
- Enter the unit address
- Detail the unit with property type, emergency contact info (that the tenants may use to contact you in the event of a unit emergency)
- Add number of bedrooms/bathrooms, and enter square footage
- Associate a property owner with the unit (if you manage the unit on behalf of a third-party owner)
- Apply a Management Fee structure to the unit - the fees you charge for managing the unit on behalf of a 3rd party owner
- Associate a Bank Account with the unit - both operating and escrow accounts may be added
- Select whether to allow Online Payments for tenants in the unit
- Associate the unit with a Unit Group
- Add pictures or other files (such as copies of lease agreement)
[In the edit unit screen] – you may perform the tasks listed above after the unit has been created
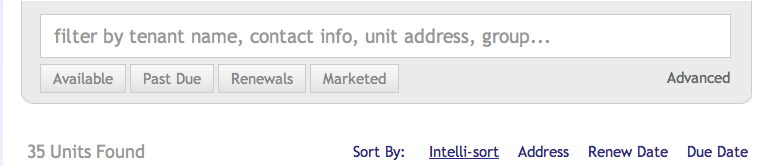
The Search and Filtering Functions - FIND WHO OR WHAT YOU’RE LOOKING FOR:
- Units & Tenants Search Bar: use the Units & Tenants search bar to find units/tenants by name, unit address, phone number, email address, owner name or group (toward the top of your screen, underneath the Units & Tenant tab)
- Filtering Options: view only specific groups of units to focus on specifics such as:
- Filter to Available/Vacant Units - (“Available” button just beneath the search bar)
- Filter to Units with Past Due Rent – only units containing tenants who have delinquent rent payments (“Past Due” button beneath the search bar)
- Units in need of Lease Renewal – filter down to those units in need of a lease renewal, in order to stay on-top-of and minimize unwanted vacancies (“Renewals” button)
- Advertised Units - Filter to only the units which have been advertized using Rentpost’s marketing function, which places unit advertisements across the leading Rental Advertisement websites (click the “Marketed” button)
- Filter by Groups - just click on the group name on the right hand side of your screen, and only the units in that group will appear
- Advanced Filtering Options: filter by price range, square footage, number of bedrooms and/or bathrooms
What are the groups used for?
- Organizing units by property or complex (such as apartment complexes)
- Organizing into different types of units (such as section 8 only)
- Categorizing units in any way best suited for your rental business
- You may also send messages/emails to tenants by group
See the screen shot below for additional visual explanation of the material already mentioned, (zoom in on your browser if you are unable to read the text)...

How to view detailed info regarding a unit or tenant
Units:
- To View Unit Actions and Display Tenants: hover over the unit you would like to make an adjustment to and an icon menu will appear on the right side of the Unit Bar. Click the unit bar, and the tenants will drop down underneath the unit bar.
- Unit Actions: Edit unit (pencil icon); Advertise unit (horn icon); Duplicate unit (double square icon); Delete unit (Subtraction icon)... see both screen shots directly above and below for visual aid
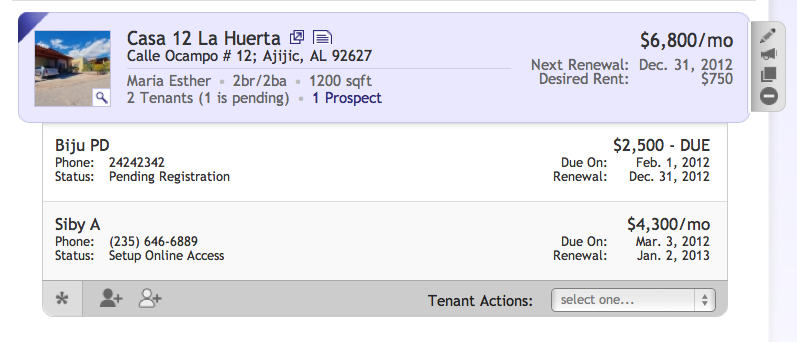
Tenants/Residents:
- View Tenant Profile: simply click on the tenant’s name and her profile will appear. In the tenant profile you may view the tenant’s payment history, edit the tenant lease/contact/billing information, record payments, adjust payments owed, view past work orders submitted by the tenant, add tenant notes

- Add a tenant to a unit: click the grayed out person icon, just beneath the drop-down list of tenants. It is next to the * symbol.
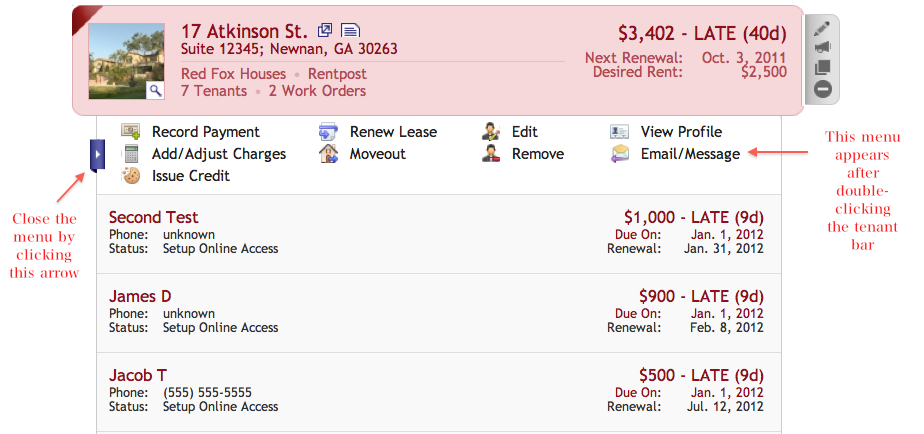
- Tenant Actions: the tasks you may perform on tenants - double click the center (blank space) of the tenant bar to bring in the menu of actions you may perform on a tenant (the tenant bar is the rectangular area containing the tenant information that drops down underneath the unit)... see screen shot below to view how to open this menu. Once open, the menu allows you to:
- Record Payment for Tenant (if the tenant did not pay you online through Rentpost – if tenant pays online, Rentpost will record the payment for you)
- Add/Adjust Charges to Tenant (this only creates, removes, or adjusts amounts a tenant owes – you may not actually mark the an amount as “paid” from this action, you must return to “record payment” screen or mark the payment as “received” from the Receivables Page in the Accounting tab)
- Renew a Tenant's Lease (until any assigned date)
- Edit Tenant Info/Details – such as adjusting the type of late fee structure the tenant is subject to, or simply changing the tenant’s contact info
- Move out Tenant – where you may asses move out fees, refund or withhold deposits, or detail the reasons for the tenant’s leaving – records of previous tenants who have moved out will be kept in the “past tenants” screen so contact info, billing history, and past payments will not be lost. This is not the same as the “Remove” tenant option, which will delete all this contact/billing info.
- Remove Tenant – will remove all information regarding the tenant, do not use this option unless you are sure the information is not needed.
- Email or Message the tenant – a message will be sent to the tenant’s Rentpost account, and an e-mail containing the message will be sent to the tenant.
- Issue Credit to Tenant – issuing a credit to the tenant will reduce the amount owed by the tenant either for current amounts owed, or for the subsequent billing cycle (if the tenant does not currently owe any payment). This is slightly different than merely adjusting the amount the tenant owes, as journal entries will be kept for the credit.
Comments
0 comments
Please sign in to leave a comment.